Monday, April 22, 2013

Cheescake Strawberries

Hey guys I am back today with a delicious treat for you.

Cheesecake Strawberries! YUMMY!!!


So I took some strawberries, cleaned them in my Shaklee H2 yep the same stuff I have been blogging about is so safe I clean my produce with it.


Then I hollowed out the inside of my strawberries so they looked like this...


Get as much of the inside out as you can but be careful not to cut the strawberry too thin. 

Then in a bowl I whipped 1 package of cream cheese (softened at room temp)
1/2 cup of powdered sugar and a tsp of vanilla together till creamy. 

 I then spooned it into a bag and cut the tip off the end and thats how I piped it into the strawberries. Yes very high tech I know! 

Anyway I ended up with strawberries that looked like this


OK So then I put 2 gram crackers in a baggie and crushed them. 

Then take your stuffed strawberries and dip them in the crackers. 


For the chocolate I used Velata Chocolate, its nice and smooth and gluten free for those of you that need that.


I just warmed mine in the microwave and drizzled it over the strawberries and there ya go Cheesecake Stuffed Strawberries.

So Simple, so good but probably not very good for you. But we all need a treat like that once in a while!

We did a date in night after the kids go to bed. It was a nice special treat for just me and the hubs.

Have a great day!

Tuesday, April 9, 2013

Get them out!!

Hey guys so did you know the following?

I hate everything about most store bought cleaners! I hate their smell, and that I can't use them around my kids! Something that is supposed to clean my house shouldn't be harmful to my family.

I use Shaklee I have blogged about it here, here and here,and here . just to name a couple of times!  Can you tell I love these products! I do! You should too! They are so much better for your family to be around, my kids use these products, I let them clean with me.

These are just my opinions and the posts are just my experiences but I think the results speak for themselves!

Have a great day!

Monday, April 8, 2013

Eastiest Pinterest project EVER!!!

Hey guys are you ready for seriously the easiest Pinterest project ever? Seriously!!
OK are you ready for all these instructions?

Take a photo frame (mine was a cheapo one from Wal Mart) ...
 Cut a piece of notebook paper to size of frame...
Put it in the frame, you are done!

 You now just made a dry erase board for anywhere you need one and it looks better than those blah white ones!

Have a great day!


Thursday, April 4, 2013

DIY Chalkboard calendar


Hey guys! How's your week going so far? 

Well I saw a picture on Pinterest when I clicked on the pic it was from Our fifth house (a great blog I love!) of this whole wall done in a calendar by chalk board paint and new I had to do it in my house! So off I went to Menards to get my supplies.

I used the following supplies:
Tape measure
painters tape
chalk board paint
cricut
cardstock paper
paint brush or roller
Wall


First of all I want to say that this is how we did it, My inspiration blog may have done it completely different!

So first I picked my wall... Please forgive my no wall picture, I see something, start something and then about step 2 or 3 go oh crap I should have taken a picture of the beginning of this project for the blog!

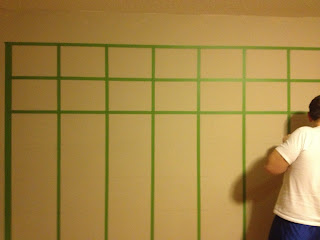
Anyway like most projects I find them the hubby helps or does the project. His next step was to divide the wall off as to where we wanted the tape (this is the time consuming part) it took about 1-2 hours for this part.


Then he taped it off. I helped a little for this part but if your not doing the measuring and marking it is hard to do the taping with out them.


Then I painted the whole thing. Like I told you earlier I find it and want to do it right now, so all I had on hand was a paint brush, rolling this would have been a lot easier and less time consuming! None the less I did it and without complaining! LOL

My husband is a horrible picture taker as you can see!


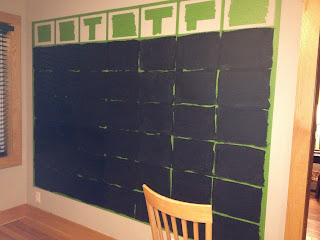
So I painted the whole thing and then I cut out the letters for the days on my cricut. While I did that Gary put tape on the boxes for the letters. Then we taped the letters up just long enough for him to cut around it with an exact o knife.


I then painted the boxes and let them dry.

The whole calendar did take 2 coats of paint but luckily it dries really fast that it doesn't leave you sitting around for too long.

Once that is done take the tape off and ta da a calendar wall.

Please don't feel overwhelmed by this project!! It is time consuming but other than the measuring and marking it is really pretty easy!

And so far it has worked out really well! I put every thing on here, our schedules, meal plans, nanny's hours. I LOVE IT!!! Yes it takes up a whole wall but it has helped to keep us so organized and the communication is great! I was notorious for keeping my calendar but then it never got relayed to my husband or kids. So I was having to take care of everything. Now he can see whats going on that week and much more willing and able to help!

Hope you have a great day!


Wednesday, April 3, 2013

Arrr! Its a Pirate Party!

Hey guys hows it going? Been crazy around here!

Last weekend we had my sons birthday party, he turned the big 6! I can't believe my little boy is six!

So about a month ago I asked him what kind of party he wanted this year, his choice...Pirate party!

So off I go to google pirate parties and WOW is there a ton. What a great theme.

Here is a run down of his party.

The birthday boy complete it his own costume.
 Isn't he cute!!
They ate lunch I meant to take a picture of the food we had but got caught up doing something else, so I will have to just tell you. We had shipwreck dogs (hot dogs), Sea weed salad (fruit), Cannon balls (cheese puffs), Cheesy Sea Shells (mac & cheese). They loved it!
 And jello ships, and cupcakes.  Below are the jello ships.

And if your children are goofy like mine then do this with the orange while eating it.
She was the treasure hunt leader/clue reader so she thought she needed a costume too.

My table scape was pretty simple, I got the table cloth at Target, put my plastic silverware into small mason jars and bunched up balloons, on top of fish netting. Then we had to have the pirate flag flying too.

 For games we did 4. We made oceans in a bottle, I saved plastic water bottles and filled them about 1/3 the way full with vegetable oil. Then I filled a pitcher with water and added some blue food coloring. Poor that in to the bottle. I left about an inch from the top so you had room for the water to move around. Then I let the kids add confetti, those glass rocks for fish tanks we had blue and green, and then I found these rubber fish, I think they were actually fishing lures without the hooks in them and they put 1 of those in there too. 

Then they did a treasure hunt around the house, the plan was to do this outside but it was COLD in Wisconsin and I wasn't sending the kids out there. So we improvised and did it inside, they had a map and clues as to where to go next, to collect their gold loot.   


The treasure hunt let them to the X were they found TREASURE!!! 
Each child was then blind folded and had to find 5 gold coins, a necklace, a ring and a jewel! They thought that was awesome!

Pin the patch on the pirate, pretty much just a pirate version of pin the tale on the donkey but it was cute watching them laugh at each other and how the patch didn't make it on the eye!
 

They "Walked the Plank" this game was a hit!  Not really sure why but they loved it! They all went once and then again and again, they were closing their eyes and trying not to fall off the board. It was too funny!

 Each of the kids got a goodie bag to put their loot in. Their loot included, their ocean in a bottle, treasure hunt coins, necklace, ring and jewel, and then we had them all dressed the part when they arrived with pirate sashes, swords, eye patches, pirate hats and beards for the boys or grown men as my husband demonstrates here...
It was a great party and the kids seemed to have a lot of fun!